原文地址:
https://blog.usedbytes.com/2021/12/pico-serial-bootloader
作者想实现通过 ESP32 的WIFI,实现一个 Wifi-UART 给它的树莓派 PICO 来更新固件。
什么是 bootloader?
Bootloader,引导加载程序是一个程序,它的用处是加载(和运行)其他程序。它们作为引导时的第一段运行的代码,去加载要后续要运行的代码。
引导加载程序通常是以阶段(stage)来划分的。通常,“第一阶段引导加载程序”很难或不可能更改(例如被固化到不可修改的 ROM 中),因此它必须要保持极简、以最大限度地减少犯错误的可能性。
首阶段(First Stage)的工作只是启动下个阶段。下个阶段可能是用户程序本身,也可能是另一个(“第二阶段,Second Stage”)引导加载程序,相比首阶段加载器,它更复杂/功能更强大并且(至关重要的是)能够被修改。
在“全尺寸”Raspberry Pi 上,有一个“第一阶段”引导加载程序被固化到芯片中的某些 ROM 中。它有一个工作:找到SD卡上(对 RPI4来说是 EEPROM中)的第二阶段引导加载程序(bootcode.bin)并运行它。第二阶段的引导加载程序有更多的能力,比如它提供了 USB 和网络引导等功能,以及理解 config.txt。它的工作是加载下一阶段的程序——通常是 Linux 内核——并启动它。因为次阶段在 SD 卡上,所以可以很容易地对其进行修改、修复和更新。这也一直被用来在 Raspberry Pi 的整个生命周期中为运行着“旧”芯片的设备添加功能。
PICO的启动流程
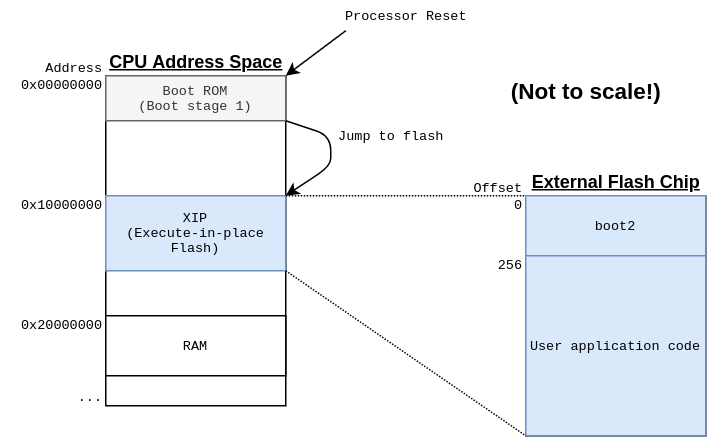
如上所述,Pico 也有一个内置在 ROM 中的第一阶段引导加载程序。RP2040启动时运行的第一部分代码始终是它,并且在物理芯片生产出来后再也没法更改。
内置引导加载程序具有固定的启动顺序,在RP2040的数据手册中有完整描述。总体而言,它检查BOOTSEL键是否被按下,如果按下则进入USB大容量存储模式来进行代码上传。如果未按下 BOOTSEL 按钮,并且看起来 Flash 中包含有效程序,则它开始执行 Flash 中的“程序”。
Pico SDK 实际上在每个程序的开头放置了一个第二阶段的引导加载程序(称为 boot2),我们将在下面进一步讨论,因此当第一阶段启动您的程序时,它实际上正在做的是启动 boot2,然后才启动您的用户程序。
我的引导加载程序将充当“第三阶段”引导加载程序,在 boot2 之后执行并允许通过 UART 上传代码,然后最终执行实际程序。
第二阶段引导加载程序boot2
与传统的微控制器不同,RP2040使用外部闪存芯片存储程序代码。近年来,这种做法变得越来越普遍,其中最著名的例子是来自Espressif的ESP8266和ESP32芯片。
RP2040的数据手册中写道:
RP2040是一个无状态设备,支持从外部QSPI存储器中进行缓存化就地执行(Execute-In-Place)。这种设计决策使您可以选择适合应用程序的非易失性存储的适当密度,并从通用闪存零部件的低价格中受益。
这个设计决策有助于保持RP2040芯片的尺寸(因此价格)较小,并允许单个芯片变体用于不同的应用程序(通过不同大小的闪存芯片)。我猜测,不将闪存放在与逻辑相同的硅片上可能还有些技术原因,这可能是决定不在RP2040上放置任何闪存的因素之一。
SPI闪存芯片有一个标准协议,使得几乎可以使用相同的协议从任何闪存芯片读取数据。该协议已经内置到Pico引导ROM中,使其能够从闪存中读取第二阶段引导加载程序boot2,而无需知道所连接的闪存的具体品牌或大小。
然而,不同的闪存制造商和产品使用不同的协议配置其芯片,以便在读取和执行代码方面提供最佳性能。boot2的任务是了解连接的具体闪存芯片,并确切地知道如何为高速、高效的代码访问正确配置它。
将这种特定于芯片的闪存设置代码放入芯片上的硬编码、不可修改的引导ROM中是不明智的,因为这样一来RP2040可以支持的闪存芯片变体将变得固定不变。
相反,当您在Pico SDK中构建程序时,它会根据您构建的是哪种类型的开发板选择适当的第二阶段引导加载程序。这里有几个版本的 boot2 能支持不同的闪存芯片,并且每个版本的代码正好是256字节,直接放置在最终的程序二进制文件的开头。这段代码使用适用于特定芯片的命令配置闪存芯片,然后运行紧随其后的主程序,该主程序直接跟随在闪存中的boot2之后。
Bootloader 的实现
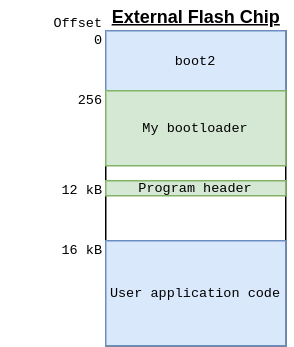
我优先考虑的事项是保持代码简洁和易于开发,而不是最小化引导加载程序的大小,所以结果它占用了将近 12 kB 的闪存!
闪存只能以 4kB 块擦除,因此闪存的前 12kB(3 块)用于 boot2 和我的引导加载程序,然后是 4kB 页面(1 块),用于保存描述程序的映像头,接着用户程序可以写入闪存的任何其他区域(例如,下图中从 16 kB 开始)。
绝对有可能用这个大小的一小部分为 Pico 编写一个串行引导加载程序——例如,我发现这个示例 (rhulme/pico-flashloader) 看起来它是在我编写我的代码的同期编写的,并且放在 < 4 kB 的空间内;或这个 (dwelch67/raspberrypi-pico/bootloader10),它确实非常小。
当我刚开始这项工作时,通常情况下,我找不到任何符合我要求的东西,所以我就自己造了轮子。代码可以在 GitHub 上找到。
我实现了一个简单的命令状态机,通过一组命令来实现擦除、写入、读取和验证闪存。 Pico SDK 为闪存擦除和编程提供辅助函数,使这部分变得简单明了。
与 bootrom 第一阶段引导加载程序类似,在检测到特定按钮被按下、或者看门狗寄存器中存在一些特殊值,或者没有已加载的有效程序的时候,我的加载器将进入编程模式。
用户程序可以放在闪存中的任何位置(只要它不在前 16 kB 中),加载程序会写入一个映像头,它描述了用户程序的起始地址和大小,以及用于验证的数据的 CRC 校验码。这个映像标头是代码用来确定是否有要运行的有效程序的内容的手段。
命令集就相对比较简单了:
CMD_SYNC
The bootloader is using a UART, so there’s no synchronisation like SPI chip-select or i2c start conditions, so there needs to be a way for the “host” and the Pico to synchronise.
The CMD_SYNC command exists for this purpose. The idea is that the host just keeps sending the 4 bytes SYNC over and over until the bootloader replies: PICO.
Whenever the bootloader encounters an error state, it goes back to “sync” mode, and it won’t do anything until the host re-synchronises.
CMD_READ
This isn’t actually used for anything in my eventual set-up, but it was the first command I implemented because it’s simple.
CMD_READ has two arguments: An address and a size. It will simply return the data from that address.
The total transfer size is limited to 1024 bytes, so you can only read up to 1 kB at a time.
CMD_CSUM
CMD_CSUM takes two arguments: address and size, and computes a checksum. It uses the RP2040’s DMA engine “sniffer” to add up all of the values of all of the bytes in the provided range, and returns the result (modulo 2^32).
Initially I couldn’t get the sniffer CRC to match a “reference” implementation, so I implemented this as a stop-gap. That issue turned out to be my own mistake.
This is/was used to check the integrity of data transferred.
CMD_CRC
Just like CMD_CSUM, but instead of a checksum, it computes a CRC. Still using the DMA sniffer. It calculates values matching the IEEE802.3 CRC algorithm, which seems widely supported (e.g. the crc32 command-line utility, the go hash/crc32 library).
CMD_ERASE
Erases a page of flash. Takes an address (which must be in the “XIP” region) and a size to erase. The address and size must be aligned to the flash “sector size”, which is 4 kB.
It doesn’t let you wipe the bootloader itself.
CMD_WRITE
This is the real business function. It writes data to flash, given an address (which must be in the “XIP” region), size and data. The address and data length must be aligned to the flash page size - 256 bytes. The maximum data length is 1 kB.
After writing the data, this calculates the CRC of the written data and returns it, so that the host can determine if everything was written correctly.
CMD_SEAL
This is how the host indicates that it’s done writing a program and sets the program header.
The host provides:
- The program start address
- The program length
- The expected CRC of the program
The implementation will calculate the CRC of the specified program range, and if successful, store the settings as the program header.
CMD_GO
CMD_GO just jumps to an address provided by the host. It has one argument: the address. It performs no validation, just resets a bunch of peripherals, sets the VTOR to the provided address, and jumps!
CMD_INFO
CMD_INFO lets the host query the parameters it needs to know to be able to use the bootloader:
- Flash (XIP) start address
- Flash size
- Erase alignment (4 kB)
- Write alignment (256 btyes)
- Max data length (1024 bytes) (not including command opcode and arguments)
CMD_REBOOT
This triggers a reboot. It takes one argument - if the argument is non-zero then it sets the watchdog registers to stay in the bootloader, instead of starting the user application (if there is one).
上位机侧
在上位机一侧,我编写了一些与引导加载程序通信的 go 代码,包括一个简单的命令行应用程序,允许通过串行端口写入 .elf 或 .bin 文件。
这一点没什么好说的。应用程序用起来是这样的:
./serial-flash /dev/ttyUSB0 firmware.elf
但实际上,我只是在使用它实现的库函数,并将这些功能嵌入到我的带 UI 界面应用程序中。
构建与 bootloader 协同工作的程序
如上所述,Pico SDK 默认将 boot2 放在程序二进制文件的起始位置,并将程序构建为从闪存起始位置开始运行。
为了使程序与我的引导加载程序兼容,我们需要跳过添加 boot2 (严格来说没有必要),并将它们设置为可以写入引导加载程序之后的闪存部分(从闪存位置起始至少 16 kB 开始)。
使用自定义链接器脚本很容易做到这一点,该脚本与默认脚本有两点不同:
- 修改闪存配置,将起始地址设为 16 kB,大小设为 (2 MB - 16 kB)
- 不添加
boot2
diff --git a/pico-sdk/src/rp2_common/pico_standard_link/memmap_default.ld b/blink_noboot2.ld
index 07d5812..448f834 100644
--- a/pico-sdk/src/rp2_common/pico_standard_link/memmap_default.ld
+++ b/blink_noboot2.ld
@@ -21,9 +21,10 @@
     __stack (== StackTop)
 */

+/* Skip 16kB at the start of flash, that's where our bootloader is */
 MEMORY
 {
-    FLASH(rx) : ORIGIN = 0x10000000, LENGTH = 2048k
+    FLASH(rx) : ORIGIN = 0x10000000 + 16k, LENGTH = 2048k - 16k
     RAM(rwx) : ORIGIN =  0x20000000, LENGTH = 256k
     SCRATCH_X(rwx) : ORIGIN = 0x20040000, LENGTH = 4k
     SCRATCH_Y(rwx) : ORIGIN = 0x20041000, LENGTH = 4k
@@ -33,30 +34,11 @@ ENTRY(_entry_point)

 SECTIONS
 {
-    /* Second stage bootloader is prepended to the image. It must be 256 bytes big
-       and checksummed. It is usually built by the boot_stage2 target
-       in the Raspberry Pi Pico SDK
-    */
-
     .flash_begin : {
         __flash_binary_start = .;
     } > FLASH

-    .boot2 : {
-        __boot2_start__ = .;
-        KEEP (*(.boot2))
-        __boot2_end__ = .;
-    } > FLASH
-
-    ASSERT(__boot2_end__ - __boot2_start__ == 256,
-        "ERROR: Pico second stage bootloader must be 256 bytes in size")
-
-    /* The second stage will always enter the image at the start of .text.
-       The debugger will use the ELF entry point, which is the _entry_point
-       symbol if present, otherwise defaults to start of .text.
-       This can be used to transfer control back to the bootrom on debugger
-       launches only, to perform proper flash setup.
-    */
+    /* boot2 would go here, but we don't want it */

     .text : {
         __logical_binary_start = .;
您可以使用 CMakeLists.txt 中的 pico_set_linker_script命令告诉 SDK 使用此自定义链接器脚本:
pico_set_linker_script(blink_noboot2 ${CMAKE_CURRENT_SOURCE_DIR}/blink_noboot2.ld)
我在 GitHub 上发布了一个与我的引导加载程序兼容的简单 "blinky "示例: https://github.com/usedbytes/pico-blink-noboot2